Saturday, March 31, 2012

Beach Photo Photoshop Editing

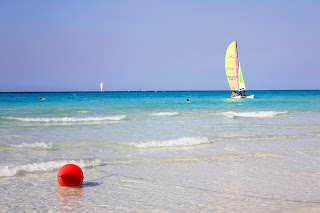
                                                ISO: 100 AV: +2.7  f: 5 SHUTTER: 1/1000
                                                            This image looks a little dark

This is the best beach photo I have took, but when I put it in the laptop, the lighting is bad. It looks a little dark, so, I put in the photoshop to make it better. I just change a brightness and contract because of this is good picture except the lighting.

Mark Mawson


Mark Mawson is an international award-winning photographer with 21 years of experience in capturing a full spectrum of people and places and specialises in shooting people underwater. His Aqueous work has become very collectable and his recent series 'Aqueous Fluoreau' went viral at the beginning of 2012. He is represented by several galleries and his personal work is in many private collections around the world.

Those images Mawson took were shock for me, and it is beautiful. the colour is wonderful. And the background is good, it let the subject come out. The water colour looks like dancing. Wish I can finger out how Mawson took this picture.


I hope one day I can take some successful photos as Mark Mawson, now, I still have problem with photography. I still have many skills need to learn. 


Reflection

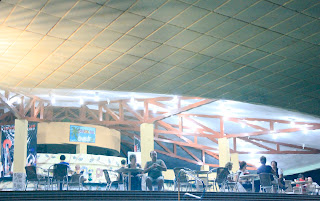
Aperture f: 5
Shutter speed: 1/16
IOS: 6400


I took this photo in night, this is a bar reflection in the swimming pool. So, it can see in the photo, there is almost half part is the swimming pool tiles - the top part. However, this photo is not successful, it give me some idea about reflection. Taking photo in night is very difficult, especially, does not has filters. But this is the good start, and it's fun. the water is good as mirror for photography.

Photoshop Editing


    Aperture f: 29                                                     
Shutter speed: 1/6                                             
IOS: 3200  
I choose the image, which I took for last week project because this is one of my favourite shoe. As we see the left image, this image is great depth of field. we can see the background very clearly, and the lighting in this image is dark, probably for the reason of I took it indoor. In the right image, I used the levels and turn the input levels to 0-1-160 that make the dark part be more darkness and the part of light-receiving turn lighter. but the darkness part does not turn dark enough. Then, I use the burn tool to make the dark part turn more darkness. Almost cannot denitrify there is a shoe case and some shoes in the background. Finally, I select the background part and the front of the floor by using the selection tool, and then I used caussian blur. the background become fuzzy~ then the whole image turn to shallow depth of field. By the way, this is my first time to use photoshop to editing a whole picture, photoshop is very hard for me, but I learned a lot in this project.

Monday, March 26, 2012

Silence

just a small table light in my work dest, however, the darkness part does not strongly, easy to make a distinction for the light part and the shadow part, the hair give some shadow fore the face. and the background show the human figure show in the right.

Aperture f: 3.5
Shutter speed: 1/60
IOS: 800

The emotion in those images are very strong - Silence. The red band come out very strongly of the black clothes and black hair. also, red is the colour of the lip. A small tear in left eye show also shows the emotion. 

Studio Lighting


Aperture f: 32
Shutter speed: 1/15
IOS: 100


Our main inspiration for this photoshoot was Nicolas Guerin who does a lot of dramatic black and white photography in front of plain, dark backdrops such as the photo you see on the left. We wanted to create a disturbing mood in the our photo and we achieved this through the lighting, the model’s expression, and the composition.
The specs for this photo are as follows: Manual mode, ISO 100, shutter speed 1/15, aperture f.32, manual white balance. We used one strobe light directly in front of the subject and used the blackboard in the classroom as the background. Sussica was the main model and Kewin was the hand model. I helped with adjusting the lights while Jimmy took the photo and made edits to the photo.

The process Jimmy took to editing the photo started with changing the mode to greyscale, adjusting the brightness/contrast, fixing the skin using the spot healing brush tool, and then adding an extra layer in order to add a dark vignette around the photo.

FIRE & ICE PHOTOSHOP


In this project, Fire & Ice, I choose the image with blue lip because colour blue represent cool, ice, and cold. And select a two different movement fire images.  I want to combine those images to show the fire come out from the blue mouth. I put three images in different layer. the bigger one fire in the layer 1, the blue mouth in the layer 2, then I used quick selection tool to remove the black area in the middle of the mouth. after, add the small fire image in layer 3 and remove the black background. for the reason of the colour of the small fire is different with the big fire, I select the brightness and contrast to make their colour become same. finally, I used eraser and set opacity in 50% to fix some outline and I get what I want. the fire comes out from the blue mouth.

Tuesday, March 6, 2012

stillness again


 I looked back the pictures I took in Cuba, I found out I took many stillness photos. I do not like take photo by a normal pose. I like to ask my friends make some fun. such as I would call their name suddenly when they walking. While they turn back to look at me, then, I take the photo. those kink of images are natural and beautiful.


Motion & Stillness


Aperture f: 36                             Aperture: 3.5           
Shutter speed: 2.0                       Shutter speed: 1/1000                      
IOS: 100                                     ISO: 100
This project is about the shutter speed. I like take photo with jumping pose, so, I decide myself to be the model in this project. In the left photo, I took this photo around 6 pm, it can see the lighting is more weaker second image. I stop F at 36, shutter 2", and ISO 100. The waves turning softy. But it is hard to make the colour better without filter. The colour of sky and the sea are not very clearly.

The second image is stillness, don't doubt, its me. I set up the tripod and the camera stutter speed to 1/1000, self-timer 2 second, ISO 100 (because the sun was very strong), and f/ 3.5 in the beach with self-timer 2 second. and that run in front of the camera and jump. I love the background, the sea level and the beach level end together toward to the sailboat. The shadow of the person also shows the action.

since the image of left above does not very motion and blur
so, I took more pictures about motion after this project.

Aperture f: 13                                   
Shutter speed: 15                           
IOS: 100   


Aperture f: 22                                 
Shutter speed: 0.8                           
IOS: 6400